

Tutorial: Custom Brushes in Corel Painter, Part One
Originally Published February 2010
Even though Corel Painter ships with hundreds of brushes, in every conceivable type of media, there are times when you wish you could tweak a brush to make it work more to your liking. But the Brush Creator is an intimidating beast. There are so many options! So many controls! Where do you begin? As they say, the journey of a thousand miles begins with a single step, so let’s take it one step at a time. Rather than attempting to explain everything about customization, we’ll take a look at some simple tweaks, and just get our feet wet. The more you know about how Painter works, the more powerful–and useful–it becomes. So let’s get started.

The first thing you should know is this: It’s not you; it’s Painter. You’re not stupid, or dense, or slow. The fault lies with Painter’s user interface for controlling the brushes. It’s confusing, unintuitive, and is missing some basic controls and functionality. This really isn’t meant as a dig at Corel. People much smarter than you or I have tried to understand the Brush Creator and are now recovering in a state-run facility, wearing a shirt on backwards, drooling the afternoon away. If you know, going in, that it’s hard, you’ll have the proper expectations. We’re going to take it in nice easy chunks, and together we will conquer this thing. Or at least, part of it.
First, a little background theory. Painter’s brush customization interface is called the “Brush Creator,” which can be misleading. Why? Because you really can’t create a brush from scratch, like you can a document. It should really be called “Brush Customizer,” because that’s how you make a custom brush: by making changes to a copy of an existing brush. Painter ships with a set of brushes which you can modify, if you like, using the process we’re going to look at next. If you decide you want to go back to the factory defaults, that’s easily done, as you’ll see. But rather than modify the delivered brush, you might prefer to make a copy of it and make it your own. Give it a name you like, such as “Suzy’s Special Spackler” or “Ted’s Terrific Blender”. For our first lesson, we’ll create our own version of the popular Captured Bristle brush. One last note: Painter uses the term “variant” a lot. A variant is just a brush, such as “Captured Bristle” or “Digital Airbrush”. Variants are grouped into categories, such as “Acrylics” or “Airbrushes.”
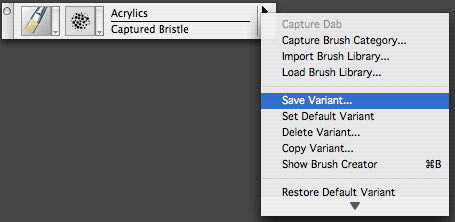
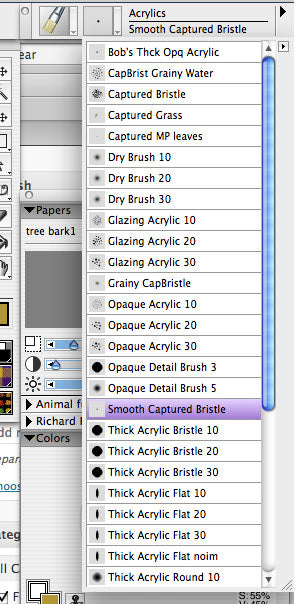
To begin, select the “Captured Bristle” variant in the “Acrylics” category (see above), using the Brush Selector. Then, click on the triangle on the right of the Brush Selector. You’ll see the drop-down menu as shown. Today we’ll just hit on a few of these menu choices. First, let’s restore “Captured Bristle” to its factory settings before we copy it. In the drop-down menu, click on “Restore Default Variant.” Nothing seems to happen, but trust me, you’ve restored the brush. Now we’ll make our copy. I’ll bet you’re thinking of clicking on “Copy Variant,” aren’t you? Silly you. Common sense would tell you to do just that, but remember, we’re in Painterland, where the rules are strange and mysterious. You should, instead, click on “Save Variant…” When you do, a save dialogue appears, with the name filled in for you as “Captured Bristle.” By changing this name, you are creating your own copy of “Captured Bristle.” Let’s call our new brush “Smooth Captured Bristle.” Just type the word “Smooth” in front of the existing name. Leave the “Save Current Colors” checkbox unchecked, and click OK. A new variation named “Smooth Captured Bristle” has been added to the Acrylics category. To see it, click on the brush selector drop-down, and there it is, down in the “S” part of the list. Select it.
Now it’s time to actually customize the brush you’ve just created. Click on the right-pointing triangle again (the one we started with — see top first screenshot, above) to get the drop-down list. From that, click on “Show Brush Creator.” (You can also go Window > Show Brush Creator, or CMD/CTL + B.) The infamous Brush Creator appears. (Cue scary music.) Here’s what it looks like.

Going down the left side you see a list of options. Click on the one called “Random.” The middle section changes depending on what you’ve selected in the list. Look for the slider labeled “Jitter.” Slide it to the left until it reads 0.00. Try drawing in the scratchpad area on the right, varying the value for Jitter, and you’ll see what Jitter does. It scatters the dab image. By turning it off, we get a nice smooth stroke, quite different from the usual Captured Bristle. And we’ve changed just one parameter to do it. Guess what? We’re done! But you need to save your work, and gee, there’s no Save button on the Brush Creator. (This is one of the missing buttons I told you about.) Right now, if you clicked “Restore Variant,” you would lose your changes. So, let’s save. To do so, go to the drop-down on the Brush Selector (not the Brush Creator, as you’d expect) and select “Save Variant…” as you did at the beginning. This time, leave the name as is (”Smooth Captured Bristle”). It will prompt you with a warning (”Are you aware that a variant with this name exists? Are you sure you know what you’re doing??”) Say “Yes.” Ahh. Now your new brush is saved.
Now see, that wasn’t so bad, was it? (If it was, please let me know, so I can straighten out the confusion right away.) This basic procedure (admittedly convoluted) is how you make customized brushes in Painter. Next time, we’ll try tweaking some of the other parameters, and see what sort of brush we can conjure up. Thanks for reading!

